To clear the Windows Update cache, stop the Windows Update service and delete the contents of the SoftwareDistribution folder. Restart the service afterward.
Windows Update cache stores temporary files related to updates. Over time, these files can accumulate and cause various issues, such as failed updates or reduced system performance. Clearing the cache can resolve these problems and ensure smoother update processes. Regular maintenance of the Windows Update cache helps in keeping your system efficient and up-to-date.
This task is straightforward and doesn’t require advanced technical skills. By following a few simple steps, you can easily manage and clear the Windows Update cache, ensuring your system remains in optimal condition.

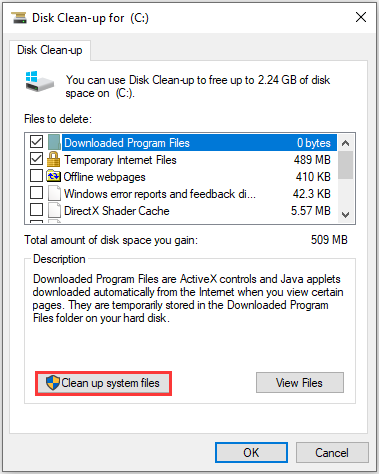
Credit: www.minitool.com
Preparation Steps
Before you clear the Windows Update cache, it’s essential to prepare. These steps ensure you don’t lose important data and can restore your system if needed. Follow the steps below for a smooth process.
Backup Important Data
First, always backup important data before making changes to your system. This protects your files from accidental loss. Here’s how to do it:
- Connect an external drive to your computer.
- Open the File Explorer.
- Select the files and folders you want to back up.
- Right-click and select Copy.
- Navigate to your external drive.
- Right-click and select Paste.
Create A System Restore Point
Creating a System Restore Point is crucial. It lets you revert your system to a previous state if something goes wrong. Follow these steps:
- Press Win + S and type Create a restore point.
- Select Create a restore point from the search results.
- In the System Properties window, click on Create.
- Enter a descriptive name for the restore point.
- Click Create and wait for the process to complete.
With these preparation steps, your data and system are safe. You’re now ready to clear the Windows Update cache.

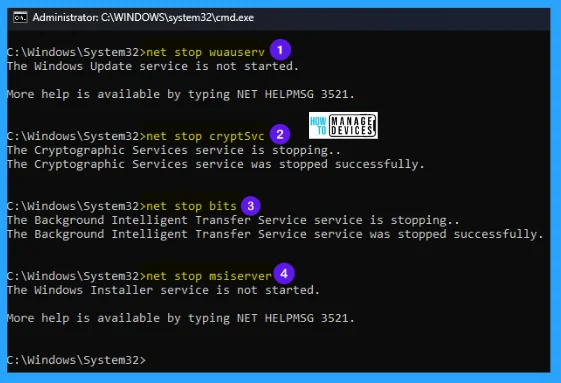
Credit: www.anoopcnair.com
Stopping Windows Update Service
Clearing the Windows Update Cache can resolve many update issues. This process often begins with stopping the Windows Update Service. This step ensures no updates are being processed while clearing the cache.
Accessing Services
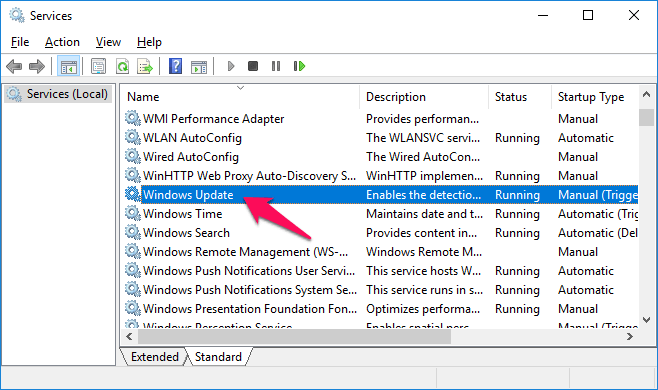
First, open the Run dialog by pressing Win + R. Type services.msc and press Enter. This action will open the Services window.
In the Services window, look for the service named Windows Update. You can scroll down or use the search feature to find it quickly.
Stopping The Service
Once you’ve located the Windows Update service, right-click on it. Select Stop from the context menu. This action will stop the service temporarily.
Wait for a few seconds. Ensure that the service status changes to Stopped. Now, you can proceed with clearing the Windows Update Cache.
Deleting Update Cache Files
Clearing your Windows Update Cache can solve many update issues. This process involves deleting temporary files stored by Windows Update. These files can sometimes become corrupted, causing update failures. Let’s go through the steps to delete these cache files effectively.
Navigating To The Cache Folder
First, you need to locate the Windows Update cache folder. Follow these steps:
- Press Win + R to open the Run dialog box.
- Type
services.mscand press Enter. - In the Services window, find Windows Update and right-click it.
- Select Stop from the context menu.
- Now, open the Run dialog box again.
- Type
%windir%\SoftwareDistribution\DataStoreand press Enter.
Removing Contents
You are now in the right folder. The next step is to delete the contents:
- Select all files and folders in the DataStore folder.
- Right-click and choose Delete.
- Confirm the deletion if prompted.
After deleting, return to the Services window:
- Right-click on Windows Update again.
- Select Start to restart the service.
By following these steps, your Windows Update cache will be cleared. This can help resolve update issues and improve system performance.
Restarting Windows Update Service
Restarting the Windows Update Service is an essential step in clearing the Windows Update Cache. This process ensures that the updates are managed correctly and any potential issues are resolved. Restarting the service can often fix common update errors, helping your system run smoothly.
Starting The Service Again
First, you need to stop the Windows Update Service. Open the Run dialog box by pressing Win + R. Type services.msc and hit Enter.
In the Services window, find the service named Windows Update. Right-click on it and select Stop.
Now, to start the service again, right-click on Windows Update and select Start. This will restart the service and help clear the update cache.
Verifying The Service Status
To ensure the Windows Update Service is running, you can verify its status. Open the Run dialog box again by pressing Win + R. Type services.msc and hit Enter.
In the Services window, locate Windows Update. Check the Status column next to it. It should display Running.
If the status is not running, you might need to start the service again. Right-click on Windows Update and select Start.
Now, you have successfully restarted and verified the Windows Update Service.
Alternative Methods
Clearing the Windows Update Cache can solve many update issues. There are several alternative methods to clear this cache. Below, we discuss how to use the Command Prompt and Windows Troubleshooter for this task.
Using Command Prompt
The Command Prompt method is quick and effective. Follow these steps:
- Press Win + R, type cmd, and press Enter.
- In the Command Prompt, type
net stop wuauservand press Enter. This stops the Windows Update Service. - Next, type
net stop bitsand press Enter. This stops the Background Intelligent Transfer Service. - Navigate to the
C:\Windows\SoftwareDistributionfolder usingcd C:\Windows\SoftwareDistribution. - Delete the contents of this folder by typing
del /f /s /q Downloadand pressing Enter. - Restart the services by typing
net start wuauservandnet start bits.
Using Windows Troubleshooter
The Windows Troubleshooter is user-friendly and efficient. Follow these steps:
- Open Settings by pressing Win + I.
- Click on Update & Security.
- Select Troubleshoot from the left-hand menu.
- Click on Additional troubleshooters.
- Under Get up and running, select Windows Update.
- Click Run the troubleshooter and follow the on-screen instructions.
By using these methods, you can easily clear the Windows Update Cache. This can help resolve many update problems on your computer.
Post-cleanup Steps
After clearing the Windows update cache, it’s important to follow a few post-cleanup steps. These steps ensure your system remains updated and stable. Let’s dive into the essential post-cleanup tasks.
Checking For Updates
Once the cache is cleared, you should check for updates. This ensures your system has the latest fixes and features. Follow these steps:
- Open Settings from the Start menu.
- Click on Update & Security.
- Select Windows Update.
- Click Check for updates.
Windows will now search for and install any pending updates. Keeping your system updated is crucial for security and performance.
Ensuring System Stability
After updating, it’s important to ensure your system remains stable. Follow these steps:
- Restart your computer to apply all updates.
- Run a system scan to check for any issues:
- Open Command Prompt as an administrator.
- Type
sfc /scannowand press Enter. - Wait for the scan to complete. This may take a few minutes.
- Check for any driver updates:
- Open Device Manager.
- Right-click on any device with a yellow warning icon.
- Select Update driver and follow the prompts.
These steps help ensure your system runs smoothly after clearing the update cache.
Troubleshooting
Clearing the Windows Update Cache can fix many problems. This process helps when updates fail to install. Let’s dive into troubleshooting steps.
Common Errors
Sometimes, updates cause errors. Here are a few common ones:
- Error 0x80070002: This error means files are missing.
- Error 0x80070020: This error means files are in use.
- Error 0x800f081f: This error means files are corrupt.
These errors stop updates from installing. Clearing the cache can help.
Advanced Solutions
Here are advanced steps to clear the Windows Update Cache:
- Stop the Windows Update Service:
- Delete Cache Files:
- Restart the Windows Update Service:
net stop wuauserv
del %windir%\SoftwareDistribution\DataStore\.
net start wuauserv
These steps ensure a fresh update process. Follow them carefully for best results.

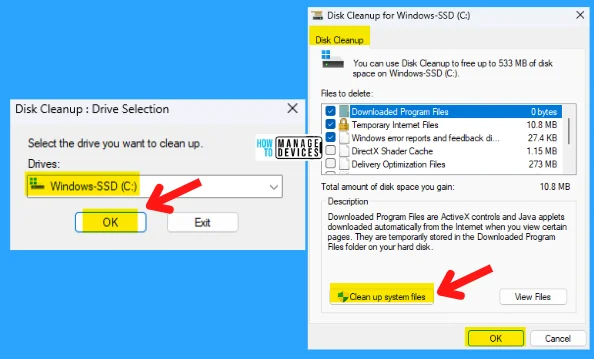
Credit: www.anoopcnair.com
Frequently Asked Questions
How Do I Clear The Cache Of Windows Update?
To clear the Windows Update cache, stop the Windows Update service. Delete the contents of the “SoftwareDistribution” folder. Restart the service. This removes cached update files.
Is Clearing Windows Update Cache Safe?
Yes, clearing Windows Update cache is safe. It can fix update errors and free up disk space. Always backup important data first.
How Do I Clear Windows Update Cleanup?
Open Disk Cleanup. Select the C: drive and click OK. Check “Windows Update Cleanup” and click OK. Confirm deletion.
How Do I Clear My Windows Download Cache?
Open File Explorer, go to the Downloads folder, select all files, and delete them. Clear Recycle Bin.
What Is Windows Update Cache?
Windows Update Cache stores temporary files for Windows updates.
Why Should You Clear Windows Update Cache?
Clearing it resolves update errors and frees disk space.
How Often Should You Clear The Cache?
Clear it when experiencing update issues or low storage.
Can Clearing The Cache Fix Update Errors?
Yes, it can resolve various Windows update errors.
Conclusion
Clearing the Windows Update cache can improve your system’s performance. Follow the steps outlined to ensure smooth updates. Regular maintenance helps prevent issues and keeps your computer running efficiently. Don’t forget to back up important data before making changes. Keep your system updated for the best performance and security.


Leave a Reply