To use Transwiz for profile migration on Windows 10, first download and install Transwiz. Then, follow the step-by-step wizard to transfer profiles.
Transwiz is a user-friendly tool designed to simplify the process of transferring user profiles between different Windows systems. It is especially useful for IT professionals and individuals upgrading to a new PC. The software streamlines the migration process, ensuring that settings, files, and configurations move seamlessly.
This eliminates the need for manual transfers, reducing the risk of data loss or corruption. Transwiz supports various versions of Windows, making it versatile and reliable. Whether upgrading your hardware or setting up a new user profile, Transwiz makes the transition smooth and efficient.

Credit: www.howtogeek.com
Introduction To Transwiz
Transwiz is a simple tool for migrating user profiles in Windows 10. It helps you transfer profiles efficiently and quickly. This guide will show you how to use Transwiz for profile migration.
Why Choose Transwiz?
Transwiz stands out for several reasons:
- Ease of Use: Transwiz is user-friendly and intuitive.
- Speed: It quickly transfers profiles.
- Compatibility: Works well with Windows 10.
Benefits Of Profile Migration
Profile migration offers several key benefits:
- Data Safety: Keeps your data safe during transfers.
- Time-Saving: Saves time by automating the process.
- Consistency: Maintains user settings and preferences.
Follow these steps to use Transwiz:
- Download and install Transwiz.
- Open Transwiz and choose “I want to transfer data to another computer”.
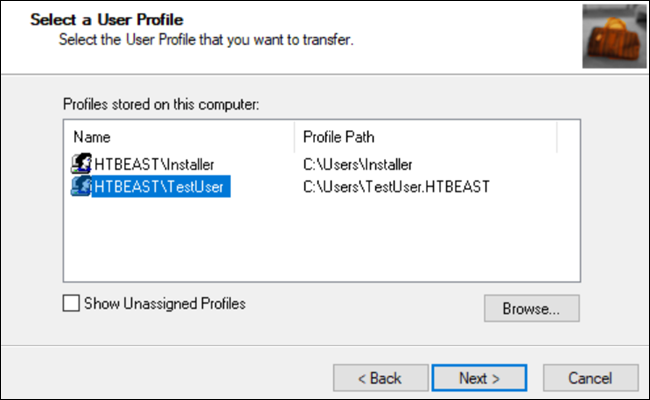
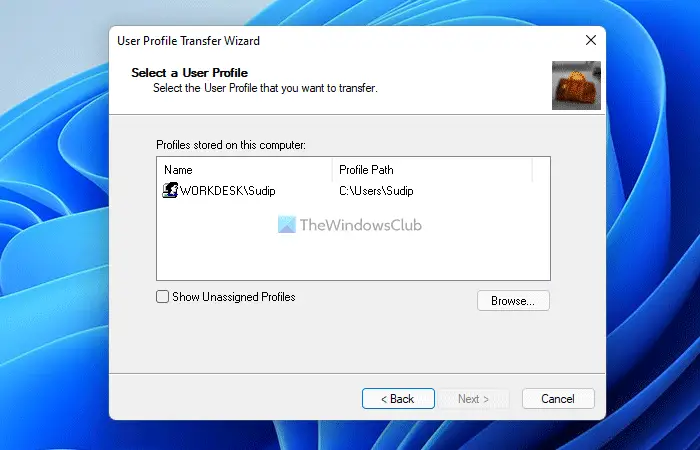
- Select the user profile you wish to transfer.
- Save the profile to a safe location.
- Transfer the saved file to the new computer.
- Open Transwiz on the new computer and choose “I have data I want to transfer to this computer”.
- Select the saved profile file and complete the migration.
Preparing For Migration
Before you start using Transwiz for profile migration on Windows 10, it’s crucial to prepare your system properly. Good preparation ensures a smooth and successful migration process. Here are the key steps to follow.
System Requirements
Make sure your system meets the minimum requirements for Transwiz. Below is a table summarizing the necessary specifications.
| Component | Requirement |
|---|---|
| Operating System | Windows 7 or later |
| Processor | 1 GHz or faster |
| RAM | 2 GB or more |
| Free Disk Space | At least 500 MB |
Backup Your Data
Always backup your data before starting the migration process. This step ensures that you don’t lose any important information.
- Use an external hard drive or cloud storage.
- Copy all important files and folders.
- Make sure the backup is complete before proceeding.
Following these steps will help you prepare for using Transwiz effectively. Proper preparation reduces the risk of data loss and ensures a smooth transition to your new system.
Downloading And Installing Transwiz
Transwiz is a powerful tool for migrating user profiles in Windows 10. This section will guide you through the process of downloading and installing Transwiz. Follow these steps to ensure a smooth migration experience.
Where To Download
You can download Transwiz from the official website. This ensures you get the latest version. Here’s how:
- Visit the official Transwiz website.
- Navigate to the Downloads section.
- Click on the download link for Windows 10.
Make sure you have a stable internet connection. This helps avoid download interruptions.
Installation Steps
Once you have the Transwiz setup file, follow these steps to install it:
- Locate the downloaded file in your Downloads folder.
- Double-click the setup file to begin installation.
- Follow the on-screen instructions to complete the installation.
- Accept the license agreement when prompted.
- Choose the installation directory or use the default path.
- Click on ‘Install’ to start the installation process.
- Wait for the installation to complete, then click ‘Finish’.
Transwiz is now installed on your Windows 10 computer.
Make sure to run Transwiz with administrator privileges. This ensures all profile data is correctly migrated.

Credit: www.thewindowsclub.com
Creating A User Profile Backup
Backing up your user profile is crucial. It ensures no data gets lost. This guide will help you create a user profile backup using Transwiz. Follow these steps to secure your data efficiently.
Launching Transwiz
First, download and install Transwiz. It’s easy and free. Once installed, locate the Transwiz icon on your desktop or start menu. Double-click the icon to launch the application. A welcome screen will appear, guiding you through the process.
Selecting The Profile To Backup
On the welcome screen, choose the “I want to transfer data to another computer” option. Click “Next” to proceed. You will see a list of user profiles available on your computer. Select the profile you wish to back up. Ensure it contains all your important data.
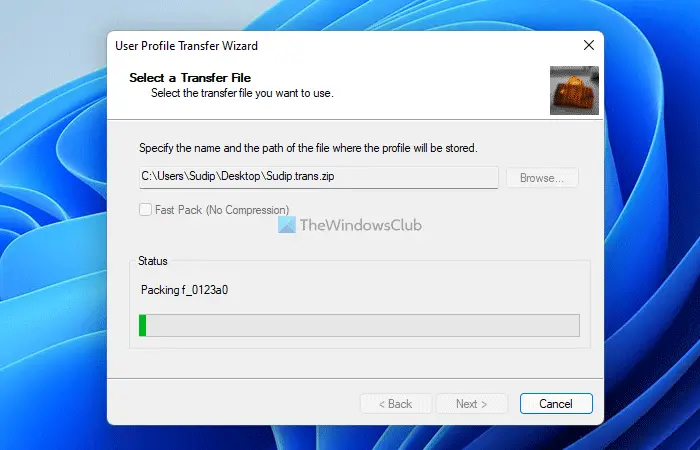
After selecting the profile, click “Next”. Choose a location to save the backup file. Make sure the location has enough space. Click “Next” again to start the backup process.
The backup process might take a few minutes. Wait until the progress bar reaches 100%. Once done, a confirmation message will appear. Your user profile is now safely backed up.
Saving The Backup File
Saving the backup file is an important step in using Transwiz for profile migration on Windows 10. This step ensures that all your data is safe and ready to be restored on the new system. Properly saving the backup file prevents data loss and makes the migration process smooth.
Choosing A Destination
First, you need to choose a destination for the backup file. This is where Transwiz will save your profile data. It is advisable to select a secure location that is easily accessible. You can use an external hard drive, a USB flash drive, or a network location.
Here is a simple table to help you decide on the best destination:
| Destination Type | Security | Accessibility |
|---|---|---|
| External Hard Drive | High | Easy |
| USB Flash Drive | Medium | Very Easy |
| Network Location | Varies | Depends on Network |
Make sure the destination has enough space for the backup file. You can check the profile size before choosing a destination.
Verifying The Backup
After saving the backup file, it is crucial to verify it. This ensures that the backup was successful and the file is not corrupted. Transwiz provides an option to verify the backup immediately after saving.
- Click on the Verify button after the backup process completes.
- Transwiz will check the integrity of the backup file.
- If verification is successful, a confirmation message will appear.
If the verification fails, it is advisable to repeat the backup process. Ensure that the destination has no issues and try again.
Verifying the backup adds an extra layer of security to your data. It ensures that your profile migration will be successful.
Restoring A User Profile
Restoring a user profile with Transwiz on Windows 10 is simple and efficient. This guide will help you understand how to transfer and restore a user profile seamlessly.
Transferring The Backup File
First, ensure you have the backup file ready. Connect the storage device containing the backup file to your computer.
Open File Explorer and navigate to the backup file location. Copy the backup file to a convenient location on your computer, such as the Desktop or Documents folder.
| Step | Action |
|---|---|
| 1 | Connect storage device |
| 2 | Open File Explorer |
| 3 | Navigate to backup file |
| 4 | Copy file to computer |
Initiating The Restore Process
Launch Transwiz on your Windows 10 computer. Select “I have data I want to restore to this computer” and click Next.
Browse to the location where you saved the backup file. Select the backup file and click Open.
Follow the on-screen instructions to complete the restore process. This process will restore all user profile settings and data.
- Launch Transwiz
- Select restore option
- Browse and select backup file
- Follow on-screen instructions
Once completed, restart your computer. Your user profile will be restored, and you can log in with your restored settings and data.
Troubleshooting Common Issues
Using Transwiz for profile migration on Windows 10 can be very efficient. Yet, some users face problems during the process. This section will guide you through common issues and how to solve them.
Dealing With Errors
Errors can disrupt the migration process. Here are some common errors and solutions:
- Error 1: “Profile not found” – Check if the profile exists.
- Error 2: “Insufficient permissions” – Run Transwiz as an administrator.
- Error 3: “File in use” – Ensure no files are open during migration.
Ensuring Compatibility
Compatibility issues can cause unexpected errors. Follow these tips to ensure compatibility:
- Operating System: Ensure both systems are Windows 10.
- Transwiz Version: Use the latest version of Transwiz.
- Profile Size: Check if the profile size exceeds the storage limit.
For more details, see the table below:
| Issue | Solution |
|---|---|
| Profile not found | Check if the profile exists |
| Insufficient permissions | Run Transwiz as an administrator |
| File in use | Ensure no files are open |
| Operating System mismatch | Ensure both systems are Windows 10 |
| Outdated Transwiz version | Update to the latest Transwiz version |
| Profile size too large | Check storage limits |
Post-migration Steps
After successfully migrating your user profile using Transwiz, it’s crucial to ensure everything works perfectly. Following specific steps will help you confirm the migration’s success and make necessary adjustments.
Testing The Restored Profile
Once the migration is complete, you need to test the restored profile:
- Log in to the new profile and check for any errors.
- Ensure all personal files and documents are intact.
- Open frequently used applications to see if they work.
- Verify that all settings and preferences are correctly applied.
Final Adjustments And Settings
Once you confirm the profile is working, make final adjustments:
- Update any missing drivers or software.
- Check for and apply any Windows updates.
- Reconfigure network settings if needed.
- Ensure all security settings and antivirus software are active.
These post-migration steps will ensure a smooth transition and optimal performance.

Credit: www.youtube.com
Frequently Asked Questions
How To Migrate A User Profile In Windows 10?
To migrate a user profile in Windows 10, use Windows Easy Transfer or third-party software. Backup data, create a new user account, and transfer files.
What Does Transwiz Transfer?
Transwiz transfers user profiles, settings, and data between Windows PCs. It ensures a smooth transition with minimal disruption.
Does Transwiz Copy Applications?
No, Transwiz does not copy applications. It only transfers user profiles and settings.
How Do I Transfer My Windows 10 User To A New Computer?
Transfer your Windows 10 user by using the built-in Windows Easy Transfer tool. Backup your data first. Install Windows 10 on the new computer. Use the tool to restore your user data and settings. Ensure all files and applications are transferred correctly.
Conclusion
Transwiz simplifies the profile migration process on Windows 10. It’s user-friendly and efficient. Follow our guide to ensure a smooth transition. With Transwiz, transferring profiles becomes hassle-free. Save time and effort by using this powerful tool. Try Transwiz for a seamless migration experience.
Enjoy your new setup with minimal downtime.


Leave a Reply